
Knockdown Textures
Contact Us

Drywall repair is one of the most crucial interior painting preparation tasks. In many years of experience in interior painting, there is no single instance where drywall repair for knockdown textures was unnecessary. Repairs are usually limited to patching holes in hangers that support shelves or pictures. Some repairs require drywall replacement or patches. You may need to replace drywall pieces for door handles, mirror removal, water damage, or opening doors and windows.
Each wall that is interior painted has a texture. You will see three types of textures most commonly: smooth, orange peel, and knockdown. Each one will be explained by Palm Beach Gardens Popcorn Ceiling Removal & Drywall Experts.
Smooth: The drywall is smooth without any texturing. After the drywall has been hung, joints are taped and floated with the drywall screws. The roller cover will provide only texture. This texture is easiest to replicate and can be found in the steps below.
- Use a suitable drywall knife to apply the drywall mud in the holes and repaired areas.
- Smoothen the patch.
- Apply a drywall primer over the patched areas.
- Use the correct roller cover nap size for wall painting, typically one-half to three-quarter inches.
Orange Peel: Drywall companies spray a drywall mixture onto walls with large pumps. This texture is more difficult to replicate.
- Usually, float the area of repaired drywall. Sand the area.
- Use a 3/8 inch or 1/2 inch roller nap to apply drywall and paint mixture. The mixture should look like pancake batter. The mix should equal ten parts drywall and 1 to 2 parts paint.
- Use 220 grit or more to sand the area lightly.
- Before painting over the patched areas, apply a primer for drywall.
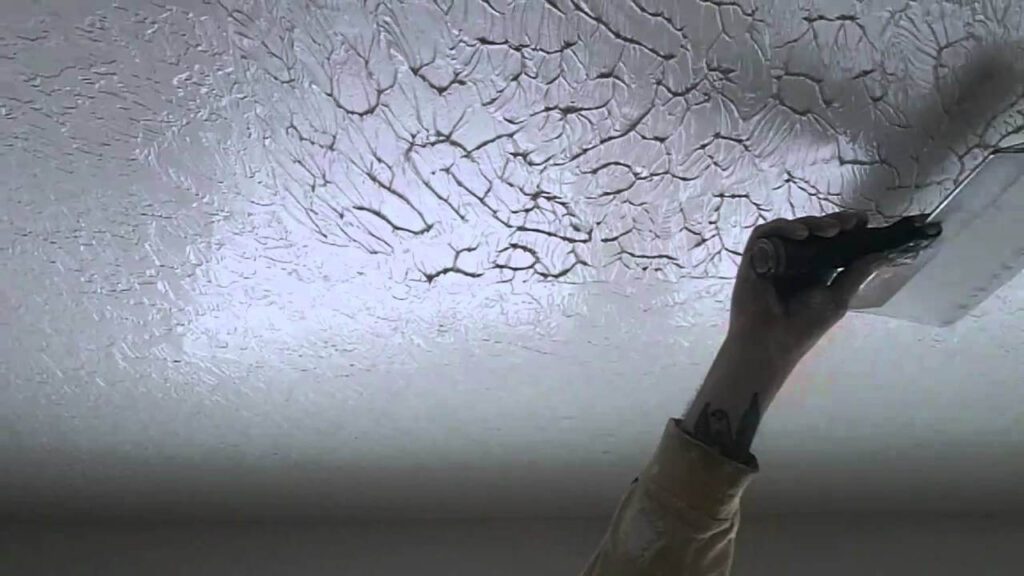
Knockdown: Also called splatter. Spraying globs of the drywall on the walls creates this texture. The resulting “splatter,” still moist after drying, can be smoothed using a powerful flat plastic knockdown tool. The texture of knockdown can be small and dense or large and sparse. It can be difficult to imitate this texture.
- Usually, float the repaired drywall. Sand the area.
- Use rolled-up newspaper to apply drywall mud. The surface of the paper will determine how tightly you roll it. For a small, dense knockdown, roll the newspaper more loosely. Now you can replicate the splatter pattern.
- After drying for 10-20 minutes, smoothen the splatter lightly with a large flat drywall blade. Then, float up, then, down, and finally, across. You can dip the knife in water before floating if the splatter has dried or cracked.
- Use 220 grit or more to sand the area lightly.
- Before painting over the patched areas, apply a primer for drywall.
An excellent interior house painting job requires careful preparation. Painting contractors know that preparation is the most complex and time-consuming part of the painting. Once the preparation is complete, it is easy to apply the paint. This article will focus on drywall texturing, a small part of house painting preparation.
Knockdown textures can be added to any wall. The textures will be diminished if the wall is painted in a single color. You can enhance the texture by applying a faux color wash finish to the wall. You can employ a brush to paint the wall with the desired color and then wash it into the wall.
Before you apply the glaze to the wall, it is possible to wipe off excess glaze. After the ice has dried, you can wipe the frost off with a damp cloth. The texture will become more prominent if the paint remains in the crevices. After the paint has dried completely, you can add another color.

You can also apply the color wash using the same steps as described, but instead of using a brush, you can use a rag. You can practice your skills on a poster board before applying the color wash. A small container of texture spray can be purchased to help touch up knockdown walls. Spray the mist onto the poster board, and allow it to dry. Paint it with the same base coat as your walls.
Although it may seem like so much work, it is well worth it. This step is often overlooked, and many people apply faux paint to the walls. This is a bad idea! Why? You have to repaint the wall with the base coat if you are not satisfied with the results. It is easier to remove the poster board and test a new one. Do not rush.
You can achieve stunning results by applying faux painting to knock down walls, such as simple color washes. Try it on your textured walls to see if the results are satisfactory.
What Can You Do To Make It Enjoyable And Straightforward?
Home improvement shows have been an excellent way for homeowners to save money and gain new skills. The internet has made it seamless to learn how to repair or texture drywall. Even stores like Palm Beach Gardens Popcorn Ceiling Removal & Drywall Experts offer training courses in this area.
Many books are available that will help you learn how to texturize drywall. Texturing is a skill that requires some practice, but it can be understood quickly. You can achieve impressive results with a few simple tools and patience.
To make drywall texturing easy, you need the right tools. You will need a trowel with a straight edge and pre-mixed joint compound for drywall texturing. If you replace a damaged sheet of drywall or install corner beads, taping and mudding are unnecessary.
Depending on what texture you choose, you may need a sprayer or a roller. Sprayers are more user-friendly and provide a consistent finish. It does not matter which sprayer you choose; you should use the one that works for you. There are many finishes available, but this article will be discussing the most popular ones: the knockdown, popcorn, and orange peel.
Knockdown is a raised texture similar to stucco. This is much less obvious than a popcorn-like finish that was popular in the ’70s. Start with a trowel to achieve this finish. Apply the joint compound liberally to the wall using the scoop. You will create high ridges that you will “knock off” with your trowel once set up.
The popcorn-style compound is not flattened, and the resulting appearance will be more prominent. You can hide any imperfections in your drywall with the popcorn finish. To create a rough texture, you can add sand to the compound. The orange peel texture comprises several “blobs” that are applied with a sprayer. This texture is reminiscent of an orange peel. It does not matter what texture you choose; it will add charm to your home if done correctly.
Mixing Texture Powder Correctly
You can buy texture powder, which is used to coat your ceilings and walls, in many forms, including powdered or ready-mixed in tubs and containers.
Purchasing texture in powdered form is the best value. You can mix it yourself to meet your needs depending on your job.
Ready-mixed texture coatings may need to be ‘watered down’ before using. This depends on what type of design you are trying to create on your ceilings and walls. However, you may get the desired consistency by just stirring the texture powder in the container without adding any water.
Mixing powdered texture in a bucket is easy. Fill the bucket about half-full with cold water unless it is stated otherwise. Next, place your texture powder in the bucket. Now, attach your texture mixing tool (sometimes called the ‘bumper,’ a round and flat plastic sphere linked to a wooden handle) to mix the powder against the bucket’s bottom. If the mixture is still too thin, add more powder. Continue mixing this way.
Mix the texture until it becomes thick, and then continue mixing it to disperse the refined texture. However, it is nearly impossible to get rid of the lumps if your consistency is too thin while you are combining.
Let it rest when the mixture becomes thick, and you feel you have dissolved most of the lumps. Then, when you return later to remix the bubbles, you might be more successful.
You can use your drill with the appropriate attachment for mixing these materials.
After you have finished your mixed bucket of texture, you should see a consistency that resembles ‘thick filler.’
This ‘thick’ mixture can fill in any gaps on your ceilings and walls. Then, thinning down the remainder will allow you to texturize your desired design or pattern onto your ceilings and walls.
Add small amounts of cold water to your mixture to thin it down. If the bucket seems to be moving while trying to blend the texture, place your feet on the floor and place them on each side of the bucket.
This project is affordable, will teach you how to tape and mud sheetrock, and can help you create the knockdown texture you desire. The most important aspect to remember when learning about drywall texturing is how much mud to use in the project. This will impact the texture you get and how long it takes to dry.
You’ve learned techniques to make drywall texturing easy and create beautiful finishes for your walls. You don’t have to stick with flat-painted walls. Instead, develop textures that complement each room in your home. It will be more satisfying to know that you made the wall. To create the perfect design, you are the one who spreads the mud and texture it with the tool that suits your needs.
Locations We Serve
We offer the above services at the following locations within Palm Beach Gardens:
If you are located in Palm Beach County and you don’t see your city/area listed above, don’t worry! We cover all of Palm Beach County. Fill out the contact form above or CLICK HERE and send us a message. We’ll get back to you asap!